
RFID/NFC
WHAT'S INCLUDED IN THE BOX
-
1 x USB to Type C connector
-
2 x Screws

REWRITING THE RFID STANDARDS
STEP 1: CHECKING YOUR RFID CARD TYPE
NOTE: If you already know your card type, please skip this step.
1. Prepare your RFID card.
2. Connect the Glory Star RFID module to your computer through the USB port only. Connect the external USB to the NEB1703 USB Type C connector to PC port.
3. From the developer pack, select Director.exe.
NOTE: This is only supported on Windows PC.
4. Select Connect. The status displays Connected to USB (COM).
5. Place the card into the NEB1703 RFID.
6. Select Search Tag. The RFID card type is displayed.

STEP 2: WRITING RFID STANDARDS TO NEBA1703
1. Connect the Glory Star RFID module to your computer through the USB port only. Connect the external USB to the NEB1703 USB Type C connector to PC port.
2. From the developer pack, select AppBlaster.exe.
NOTE: This is only supported on Windows PC.
3. Select Configurable project.
4. Select one of the following:
• For keyboard mode, select Multi Keyboard V4.06. App Standard V2.04.
• For read and write mode, select Multi CDC V4.06. App Standard V2.04.
5. Select Select Template.

6. Select Transponder Types, and then add your RFID card type.

7. Select Create Image.
8. Select Program Image.
STEP 3: FINDING API
1. Select Read and Write Mode before adding configuration.
2. Select Docs → TWN4 Simple Protocol DocRev24 to see list of developer commands.
STEP 4: INSTALLING THE RFID MODULE TO DISPLAY
Select the display to install and follow the corresponding procedure.
STEP 5: TESTING THE RFID CARD ON THE NEBA1703ECC RFID MODULE
Use the Star Tool Demo APK installed on the device to test your RFID card. If you don’t have it, please contact sales@glorystargroup.com.
1. Open the Star Tool Demo APK app.
2. From the Modules section, select RFID.
3. Scan your RFID card on the RFID module. Use an RFID card that supports the RFID standards listed under All supported transponders. Your card type and card ID information are displayed.

CONFIGURING RFID FOR TOUCH SCREEN DEVICES
1. Launch the Star Tool app.
2. From the Addon Modules category, select Enter.

3. Select RFID module.

4. Hover an RFID card on the RFID module, and then select Scan card. The Card type and Card ID are displayed.

5. To change the RFID value, type an RFID value, and then select Write value.

6. Select Read card to check new RFID card value.
NEBULA KIOSK RFID/NFC
Before installing the RFID to your kiosk tablet, configure the module first.
INSTALLING MODULE
1. Connect the RFID/NFC module to a Micro USB port of the tablet.

2. Secure the RFID/NFC module with two screws.

NEBULA PLUS RFID/NFC
Before installing the RFID to your kiosk tablet, configure the module first.
INSTALLING MODULE
1. Connect the RFID/NFC module to a USB Type C port of the tablet.

2. Secure the RFID/NFC module with two screws.
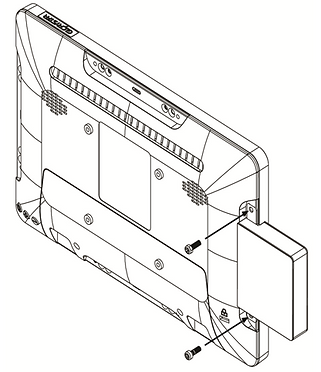
ULTRON TOUCHSCREEN COMPUTER
Before installing the RFID to your kiosk tablet, configure the module first.
INSTALLING MODULE
1. Connect the RFID/NFC module to a USB port of the tablet.

2. Secure the RFID/NFC module with two screws.
