
INSTALLATION AND SETUP
Select a preferred configuration for the device before installing the product and setting it up for use.
CAUTION: Follow the installation instructions properly to avoid dropping and damaging the display.
UNPACKING THE BOX

OUT OF THE BOX FAILURE
If you experience an out of box failure (OBF) during installation in relation to missing, incorrect, or defective unit or item, send an email to support@glorystargroup.com and provide a description of the issue. Glory Star will first troubleshoot the problem over phone or video to help resolve the issue. If Glory Star determines that a product or component has to be returned to the factory, it will instruct the customer how to remove the components from the product.
POWERING THE DEVICE ON/OFF
AST315
To power on/off the AST315 device, perform the following steps:
-
Press the POWER button once to turn on the device. The C-LED will flash green light 15 times and then the light will turn off. The device is now turned on. Currently the P-LED light flashes once every 3 seconds.

-
Press the POWER button once, the C-LED will flash green light. Press the POWER button again to turn off the device.
AST133
To power on/off the AST133 device, perform the following steps:
-
Press the POWER button. The LED will flash red light to indicate the device is turned on.
-
Press the POWER button again to turn off the device.

Battery Status
If battery charge is 15% or below, Low battery will display on the bottom-left corner of the screen. Connect the charger to charge the battery.
When the battery is charged, reflash the screen to remove the Low battery icon.

INSTALLING THE WALL MOUNT
The Wall Mount accessory is purchased separately and is used to mount the display on wall.
To mount the display on the wall, follow these steps:
1. Lay the display face down on a flat surface.
CAUTION: Always use a soft material, cloth or foam, to protect the display when placing the screen face down.
2. Mount the monitor bracket at the back of the display. Secure the bracket with four M4 x10 bolts and washers.

3. Place the wall plate on the wall and mark the six mounting holes.
4. Align the wall plate with the mounting holes. Secure the plate to the wall with lag bolts and log bolt washers.

5. Align the display with the wall plate, and then carefully slide down the display until the bracket is safely secured to the wall plate.
6. Press the POWER button to turn on the device.

ENABLING WI-FI MODE
To enable Wi-Fi on your device, follow these steps:
-
Power on the device. Refer to the Powering the Device On/Off section for information on turning on the device.
-
Press and hold the UP button for 3 – 5 seconds and then release.
-
Wait until the MAC address is displayed on the screen.

4. Use your computer or mobile phone to access Wi-Fi. Search for XT_ESP_xxxx, and then connect using 1234567890 as password.
5. Open the Google Chrome browser, and then enter the 192.168.4.1.
6. From Server Set section, enter the following details, and then select SET.
-
Server Type: MQTT
-
Server IP: 106.14.54.252
-
Server Port: 1883
7. From the Local Set section, select DHCP, and then select SET.

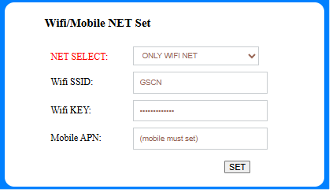
8. From the Wi-Fi/Mobile NET section, enter the details of the following fields, and then select SET.
-
Wi-Fi SSID – name should not contain spaces or symbols
-
Wi-Fi Key – password should be within 18 characters
9. Restart the device. The MAC address should display on the screen.
10. Save the MAC address for StarControl registration. The device is now successfully connected to the Wi-Fi network.
NOTE: The device only supports 2.4 GHz wireless connection.
11. The device’s network connection automatically shuts down after 3 minutes. Restart the device to automatically connect to the network.
UPDATING THE DEVICE IMAGES USING USB DRIVE
To update images displayed on your device using USB drive, follow these steps:
-
Download the XT.zip files from the following link: https://drive.google.com/drive/folders/1bVKOv89Qv1AC1LWruKwIRnFYW7eBrbOT?usp=sharing
-
Copy and install the image processing tool xtacep.exe to your computer.
-
Double-click on xtacep.exe to open the software.
-
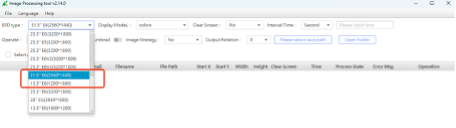
From the FPD type field, select the model and resolution of your device:
-
AST133: E6 ( 1200 x 1600 )
-
AST315: E6 ( 2560 x 1440 )
5. From the Please select save path field, select the folder in your USB drive where the converted files will be saved to.
Note: USB drive should be 32GB, FAT32 format.

6. To select the images to convert, select File → Choose Folder.

AST133: If the device setup is in landscape mode, rotate the image before placing in the folder.

AST315: If the device setup is in portrait mode, rotate the image before placing in the folder.

7. Select the folder where the images are located.
8. Select the Interval Time from the drop-down list, and then select Process to convert the images.

9. Copy the XT_Resources folder to the USB drive.
10. Insert the USB drive into the USB port of the display. Ensure the device is turned off.
11. Power on the device. Wait for the image to refresh. Once the images display on the screen, remove the USB drive.
PUSHING IMAGES TO THE DEVICE STAR CONTROL
To push images to the device using StarControl, follow these steps:
-
Sign up for a StarControl account for the device in https://www.thestarcontrol.com/2/devices/devicecontrol
-
Select Sign In. The Dashboard is displayed.
-
Select Register device → Register E-paper.
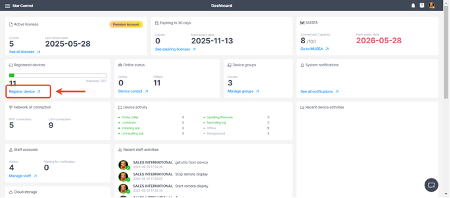

4. Enter the MAC address, select the Binding License, and then select Register. Note: The device must be connected to a wireless network.

5. To upload images, select Library → Media Files →Image. Select the images to display on the device.

6. From the Device list, select the device to use, and then select Send image.

7. Select the images you want to push to the device, and then select Confirm.

8. Customize the images according to how these are to be displayed. Select Push to push the images to the device.
Note: The device must be connected to a wireless network.

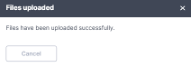
9. The images are then sent to the device. Select Close to close the pop-up window.
